
Gib stopping, also known as taping and jointing, is an essential part of the process of creating smooth and seamless walls and ceilings. This technique involves applying a compound to the joints between plasterboard sheets (also known as gib boards) and covering them with tape to create a flat, smooth surface. In this blog post, we will share some techniques and tips to help you achieve a professional finish when performing this fine art.
Preparing the Surface
Before you begin the process of gib-stopping, it’s crucial to prepare the surface correctly. Ensure that the plasterboard sheets are securely fastened to the framing and that there are no protruding screws or nails. If necessary, use a utility knife to trim any excess material from the edges of the sheets. Vacuum or wipe down the surface to remove any dust or debris, as this can interfere with the adhesion of the joint compound ( also known as drywall mud, drywall compound, joint cement, or mastic).
Choosing the Right Materials
Selecting the right materials is vital for a successful gib-stopping job. Use a high-quality drywall mud, specifically designed for gib-stopping plasterboard. This type of compound typically has a longer working time and better adhesion than general-purpose compounds.
Mixing the Joint Cement or Drywall Compound:
Properly mixing the joint mud is crucial for achieving a smooth and consistent finish. Follow the manufacturer’s instructions for mixing the compound to the correct consistency. Generally, it should be smooth and creamy, with a consistency similar to whipped cream. Avoid overmixing, as this can introduce air bubbles into the compound, which can cause problems during application.
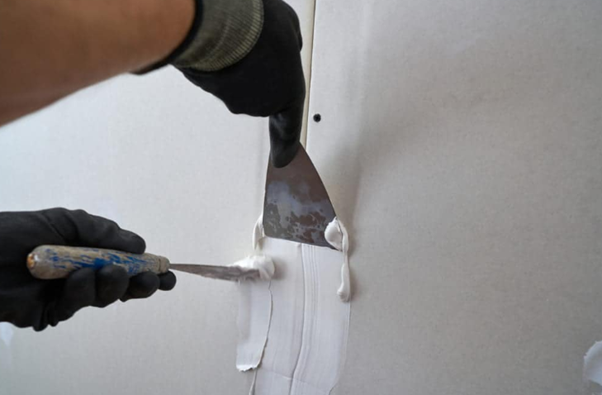
Applying the Mastic:
When applying the mastic, follow these steps for the best results:
- First Coat: Apply a thin layer of drywall mud to the seam between the plasterboard sheets using a taping knife. Ensure that the compound extends slightly beyond the edges of the seam.
- Tape Application: Press the tape into the wet compound along the seam, ensuring it is centred over the joint. Use the taping knife to smooth out any bubbles or wrinkles in the tape.
- Second Coat: After allowing the first coat to dry (as per the manufacturer’s instructions), apply a second layer of drywall mud over the tape. This coat should be wider than the first, extending about 1-2 inches beyond the edges of the tape. Feather the edges of the compound to blend it seamlessly with the surrounding plasterboard.
- Third Coat: Once the second coat is dry, apply a final, thin layer of mastic or drywall compound, extending it even further beyond the edges of the tape. This coat should be very smooth and feathered, creating a seamless transition between the taped joint and the surrounding plasterboard.
Sanding and Finishing
After the final coat of the joint compound has dried completely, it’s time to sand the surface to create a smooth, professional finish. Use fine-grit sandpaper (around 150-180 grit) attached to a sanding block or pole sander to gently sand the surface, focusing on the edges of the mastic to ensure a seamless transition to the surrounding plasterboard. Be careful not to over-sand, as this can damage the tape or the plasterboard itself.
Once the surface is sanded to your satisfaction, wipe it down with a damp cloth to remove any dust or debris. You are now ready to prime and paint the surface, completing the fine art of gib-stopping.
Final Thoughts
Achieving a professional finish in taping and jointing plasterboard requires patience, attention to detail, and the right techniques. By following the tips and techniques outlined in this blog post, you can master the fine art of gib-stopping and create smooth, perfect walls and ceilings in your home or building project. Remember, practice makes perfect – so don’t be discouraged if your first attempt doesn’t turn out exactly as you’d hoped.


Comments