
Tom Bollnow is the senior director of technical service at the National Roofing Contractors Association. According to him, asphalt shingles account for almost 70 percent of all domestic roofing installations. Asphalt shingles are popular for a good reason. They’re lightweight, durable, beautiful, and affordable compared to other roofing materials.
Even the most advanced asphalt shingles can have problems with time. Asphalt shingle roofing is the easiest to repair. Curled shingles are simply flattened, re-secured, and replaced. Asphalt shingles also make it easy to detect a serious roof problem. If you follow the four steps outlined below to repair a leaky roofing system, your problem may be short-lived.
-
- Find the Roof Leak:
When you notice that your roof has a leak, most likely indicated by water stains on the ceiling, note the location. Then go outside and use binoculars with good quality to locate the roof leak. Check for curled, damaged, or missing shingles. Anywhere where the shingles meet, or caulking has been compromised can cause leaks. Check the end caps, which are the tent-shaped shingles covering the angular peaks on the roof.
- Secure Curled Shingles:
You can re-secure curled-back shingles by applying a layer of asphalt roofing compound or its equivalent in tubes that you can use with a caulking gun (like Henry Rubberized Wet Patch in a 10.1-ounce cartridge available at Home Depot). You’ll need to use a lot of roofing cement on the underside of shingles to secure the corners and edges. Press firmly until it sets. When resolving problems, remember that shingles are more flexible in warmer weather.
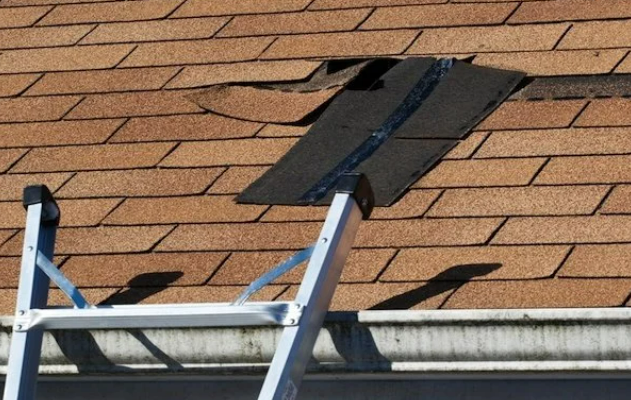
- Replace Damaged or Missing Roof Shingles:
Replace shingles that are missing, cracked, or rotten (provided you have replacement shingles). Remove a damaged shingle by lifting the edges of surrounding shingles. Use a prybar to carefully remove the nails. The shingle will slide out once the nails have been removed. Remove any cement residue from the roof. Also, level or remove any protruding nails.
Round the corners of the new shingle with a utility knife before you replace it. It will be easier to align the shingles on both sides and slide the shingle underneath the one above. After you’ve got it in place, lift up the corners of the overlapping tiles and secure the top of your new replacement using 6D galvanized roof nails (such as these 2-inch options at The Home Depot). Secure with nails at each corner. Cover the nail heads and the overlapped shingle edges with roof cement.
- Fix the Flashing:
Re-seal joints with caulk filled with roofing cement to repair leaks around chimneys and domes. Apply a new coat of roofing cement to any joints that have been damaged by a previous line of roof cedar.
It may be necessary to hire a roofer if you need to replace shingles in an entire row or if shingles are lifting off the roof. The life of a roof that needs replacement will not be extended by spot repairs.
This article was written by a roofing professional at Roofing.co. At Roofing.co, we’re determined to be the only one you need to hire when looking for Clearwater roofers. We take a modern, professional approach to the roofing business in order to ensure our customers in St. Petersburg and the Central Florida region have the best possible experience whenever they choose us.


Comments