
Pre-Repair Essentials: Assessment, Tools, and Safety
Before we even think about climbing a ladder, it’s crucial to understand the type of damage we’re dealing with, gather the right equipment, and, most importantly, prioritize safety. A little preparation goes a long long way in ensuring a successful and safe repair.
Identifying Repairable Damage
Not all roof shingle damage is created equal, and knowing what you can realistically repair yourself is the first step. Homeowners searching for Houston area roof shingle repair services often encounter these common types of shingle issues that can typically be fixed without requiring a full roof replacement:
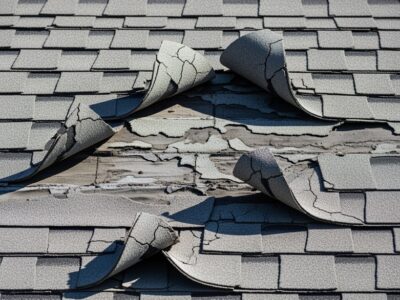
Missing or Blown-Off Shingles: Strong winds are a common culprit here. These are shingles that have been completely dislodged from the roof, leaving an exposed area. This is a critical repair as it directly exposes your roof decking to the elements, leading to leaks and potential structural damage.
Curled Shingles: Over time, exposure to the sun’s UV rays can cause asphalt shingles to curl, either at the edges (cupping) or in the middle (clawing). This often happens as the shingle ages and loses its flexibility. While not an immediate leak risk, curled shingles can lift in the wind, become brittle, and eventually crack or break off, compromising the roof’s integrity.
- Cracked or Torn Shingles: Hail, falling debris, or even foot traffic can cause shingles to crack or tear. These fissures, even small ones, can allow water to seep underneath, leading to leaks and rot in the underlying roof structure.
Damage Assessment Checklist: When inspecting your roof, look for these signs:
- Wind Damage: Check for shingles that are lifted, creased, or completely missing, especially after a storm.
- Hail Damage: Look for circular dents, cracks, or areas where granules have been dislodged, often appearing as dark spots.
- Age-Related Wear: Observe general deterioration, excessive granule loss, widespread curling, or brittleness.
- Water Stains: Inside your home, water stains on ceilings or walls are a definitive sign of a roof leak, indicating damage that needs immediate attention.
- Granules in Gutters: While some granule loss is normal, large accumulations in your gutters can signal that your shingles are deteriorating rapidly.
By carefully assessing the damage, we can determine the appropriate repair method and avoid unnecessary work or, conversely, neglecting a more serious issue.
Gathering Your Toolkit
Having the right tools and materials on hand before we start is essential for an efficient repair. We don’t want to be halfway through a job and realize we’re missing something critical.
Here’s a list of tools and materials we’ll need for repairing roof shingles:
- Replacement Shingles: It’s best to have matching shingles. If your builder left spares, great! Otherwise, we’ll need to buy a bundle. Standard three-tab shingles typically cost around $15 to $20 per square (100 sq. ft.), making spot repairs quite affordable.
- 1 1/4-inch Roofing Nails: These are specially designed for roofing, with wide heads for better grip.
- Hammer: A standard claw hammer will work, but a roofing hammer with a magnetic nail starter can make the job easier.
- Flat Pry Bar: Essential for lifting shingles and removing old nails without damaging adjacent shingles.
- Utility Knife: For cutting new shingles to size or trimming away damaged portions.
- Caulking Gun: To apply roofing sealant.
- Roofing Sealant (Roofing Cement/Asphalt Cement): This adhesive is crucial for sealing down new or repaired shingles. A 10-oz. tube costs about $4.
- Heavy-Duty Gloves: To protect our hands from sharp edges and rough surfaces.
- Safety Glasses: To protect our eyes from debris, granules, and flying nails.
- Sturdy Ladder: Ensure it’s tall enough to safely reach the repair area.
- Roof Harness (for steep roofs): For roofs with a significant pitch, a safety harness and rope system are non-negotiable. Safety should always be our top priority.
- Bricks or Weights: For holding down newly sealed shingles while the adhesive cures.
- Putty Knife: For spreading roofing sealant smoothly.
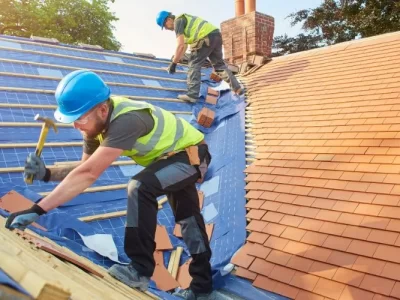
Safety First: Preparing for a Roof Job
Working on a roof can be dangerous. Falls are a leading cause of injury in home improvement projects. We must take every precaution to ensure our safety.
- Ladder Safety: Always place the ladder on firm, level ground. Ensure it extends at least three feet above the edge of the roof. Have someone hold the ladder steady while we ascend and descend.
- Non-Slip Footwear: Wear shoes with good grip, preferably rubber-soled work boots. Avoid sneakers or worn-out shoes.
- Working on Dry Roofs: This is paramount. Never climb onto a roof that’s wet, icy, or covered with morning dew. Shingles become incredibly slippery when wet. Always make roof repairs on a warm, dry afternoon; the shingles will be more supple and less likely to crack.
- Avoiding Icy or Wet Conditions: Beyond just being slippery, extreme cold can make shingles brittle and prone to cracking during repair. Extreme heat can make them too soft and difficult to work with. A mild, dry day is ideal.
- Working with a Partner: Even for small repairs, having a second person present is a good idea. They can spot for you, hand up tools, and call for help if an accident occurs.
- Roof Pitch Awareness: Be aware of your roof’s slope. If it’s steep, a safety harness is not an option—it’s a requirement. Consider renting or borrowing one if you don’t own one. If the pitch makes you uncomfortable, it’s a clear sign to call a professional.
Step-by-Step Guides for Common Shingle Repairs
Once we’ve assessed the damage, gathered our tools, and established a safe working environment, we can proceed with the repairs. Here, we’ll cover the most common types of shingle damage and how to fix them.
How to Replace a Missing or Blown-Off Shingle
This is perhaps the most common and critical repair. A missing shingle leaves your roof decking vulnerable to water intrusion.
- Prepare the Area: If there are any remnants of the old shingle or debris, clear them away. Ensure the area is clean and dry.
- Break the Sealant Bond: Shingles are typically sealed to the course below them. To remove the damaged shingle (or make space for a new one), we need to carefully break the adhesive bond of the shingles directly above and to the sides. Slide your flat pry bar gently under the shingle immediately above the area where the new shingle will go, and gently lift. You might hear a slight tearing sound as the sealant separates. Do this for the adjacent shingles as well, creating enough space to work.
- Remove Old Nails: The shingle you’re replacing, and the shingle above it, will have nails driven through them. Shingles are typically secured with four nails, but nails from the course above also pass through the top edge of the shingles in the course below. This means you might have to remove up to eight nails to free a single shingle. Slide the pry bar under the shingle directly above the damaged one, positioning the claw over the nail heads. Press down on the pry bar handle to lift the shingle and pull out the nails. Repeat this for all nails holding the damaged shingle in place.
- Remove the Damaged Shingle: Once all the nails are out and the surrounding shingles are loosened, the damaged or missing shingle should slide out easily.
- Prepare the New Shingle: If the new shingle is too long or needs trimming to fit, use your utility knife. If it’s a standard three-tab shingle, it should fit perfectly.
- Align and Slide in New Shingle: Carefully slide the new shingle into the vacant spot, aligning its bottom edge perfectly with the shingles on either side. Ensure it slides underneath the overlying shingle.
- Secure with Nails: Lift the tabs of the new shingle and nail it into place. Drive four roofing nails just above the cutouts, ensuring they penetrate the roof decking. Make sure the nails are flat and don’t protrude.
- Seal Tabs with Roof Cement: Now, lift the tabs of the new shingle and apply a small dab (about a 1-inch diameter spot) of roofing sealant under each tab. Press the tabs down firmly. Also, apply sealant under any adjacent shingles that you lifted to break their bond, pressing them back into place. This step is crucial for wind resistance and water shedding.
How to Fix a Curled Shingle Corner
Curled shingles can be a precursor to more serious damage. Fixing them is relatively simple.
- Choose the Right Day: This repair is best done on a warm, sunny day. The heat will make the asphalt shingle more pliable and less likely to crack when you try to flatten it.
- Gently Lift: Carefully lift the curled corner of the shingle. If it’s very stiff, you can try to warm it gently with a heat gun on a low setting, but be extremely careful not to overheat or damage the shingle.
- Apply Sealant: Using your caulking gun, apply a small dab of roofing sealant underneath the curled corner. We only need enough to create an adhesive bond, not so much that it oozes out.
- Press Down and Weigh: Press the shingle corner down firmly against the shingle below it. To ensure a good bond, place a brick or another heavy, flat object on top of the repaired area.
- Curing Time: Leave the weight in place for at least 24 hours (or longer if the sealant instructions recommend it) to allow the sealant to properly cure and bond the shingle.
How to Repair a Cracked or Torn Shingle
Small cracks or tears can be sealed to prevent water intrusion. If the shingle is severely torn or brittle, replacement (as described above) is the better option.
- Clean the Area: Ensure the cracked area is clean and free of debris.
- Apply Sealant Under the Crack: Using your caulking gun, apply a thick bead of roofing sealant directly underneath the crack.
- Press Shingle Down: Press the shingle down firmly, ensuring the sealant spreads and fills the void beneath the crack.
- Apply Sealant Over the Crack: Apply a second bead of roofing sealant directly over the crack.
- Spread Evenly: Use a putty knife to spread the sealant smoothly and evenly over the crack. This creates a waterproof patch.
- Camouflage the Repair (Optional but Recommended): To make the repair less noticeable, especially on asphalt shingles, we can camouflage it. Collect some loose granules from your gutters or scrape them from an old, spare shingle (or even the underside of a new one). While the sealant is still wet, sprinkle these granules over the patched area. Gently press them into the sealant. This helps the repair blend in with the surrounding roof. The best part of this fix is that no one has to know you made it!
Innovating for the Future: Solar, AI, and VR in Home Maintenance
As technology continues to advance, so do the tools and resources available to homeowners for maintaining their properties. While traditional DIY methods remain effective, innovations in AI and VR are beginning to offer new ways to approach home repair and maintenance, including roofing.
The Role of AI and VR in Modern DIY Projects
Imagine being able to diagnose a roof issue with your smartphone or visualize a repair before lifting a single tool. This is where AI and VR are heading.
- AI-Powered Guides: Artificial intelligence can already power diagnostic apps that analyze photos of your roof damage, identify the type of shingle, and suggest the most appropriate repair method, even linking to step-by-step guides. This can significantly reduce the learning curve for DIYers.
- Diagnostic Apps: Some apps are emerging that use image recognition to spot anomalies on your roof, like missing shingles or potential weak spots, by simply scanning a photo or video.
- Project Visualization: Virtual reality (VR) offers an immersive way to plan and understand complex repairs. We could walk through a virtual model of our roof, see exactly where the damage is, and even practice the repair steps in a simulated environment. This can build confidence and reduce errors before any real work begins. As technology evolves, the resources available to homeowners expand. Creating detailed, custom repair plans often involves advanced collaborative prompt engineering to generate precise instructions for AI models, leading to highly custom advice. Similarly, professionals are increasingly using virtual reality for complex training, and homeowners can find VR innovation reviews to explore how this tech can help visualize project outcomes before starting. This blend of AI and VR promises to make DIY projects more accessible and less intimidating.
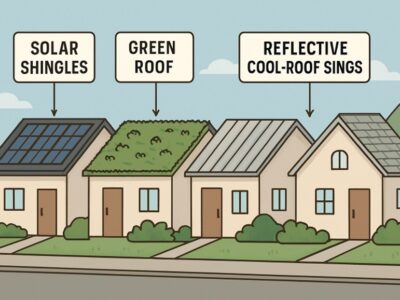
Considering Solar Panels During Roof Repairs
If we’re already up on the roof, it might be an opportune time to consider future home improvements, such as installing solar panels. Insights from VR innovation reviews show how emerging visualization tools can even help homeowners preview solar installations before committing, making planning more efficient.
Structural Considerations: Solar panels add weight to a roof. If we’re repairing shingles, it’s a good moment to assess the overall condition of the roof decking and structure. If it’s nearing the end of its life or shows signs of weakness, a full roof replacement might be a more sensible investment before adding solar.
Combining Projects: Installing solar panels often requires removing and replacing some shingles anyway to install the mounting hardware. Combining a shingle repair project with a solar panel installation can be more cost-effective than doing them separately, as it reduces labor costs for roof access.
Long-Term Savings: A healthy roof is a prerequisite for a long-lasting solar array. Ensuring our roof is in top condition before installing solar panels means we won’t have to remove and reinstall the panels prematurely for roof repairs down the line, saving us significant money and hassle.
Roof Readiness for Solar: Discussing our roof’s condition with a solar installer during the planning phase can help ensure that our roof is ready for the demands of a solar energy system, contributing to greater energy efficiency for our home.
When to Call a Professional: Recognizing Your DIY Limits
While many shingle repairs are manageable for the average homeowner, it’s crucial to recognize when a job is beyond our DIY capabilities. Attempting complex or dangerous repairs can lead to further damage, injury, or voided warranties. For extensive damage, or if you’re simply not comfortable working at height, it’s always best to contact a professional. For instance, homeowners in specific regions might seek out a specialist for Houston area roof shingle repair to ensure the job is done correctly and safely.
Here’s a table comparing DIY repair versus professional repair:
| Criteria | DIY Repair (Self-Performed) | Professional Repair (Hired Contractor)”


Comments